
Maintaining Pet Grooming Tools for Optimal Performance
Over 80 percent of pet owners say their grooming tools wear out much sooner than expected. Keeping these tools in top shape saves money and helps avoid grooming mishaps. A bit of simple maintenance can keep clippers, scissors, and brushes performing like new every time you need them. Whether you care for a shaggy dog or a short-haired cat, the right upkeep routine protects your investment and makes pet care safer and easier.
Table of Contents
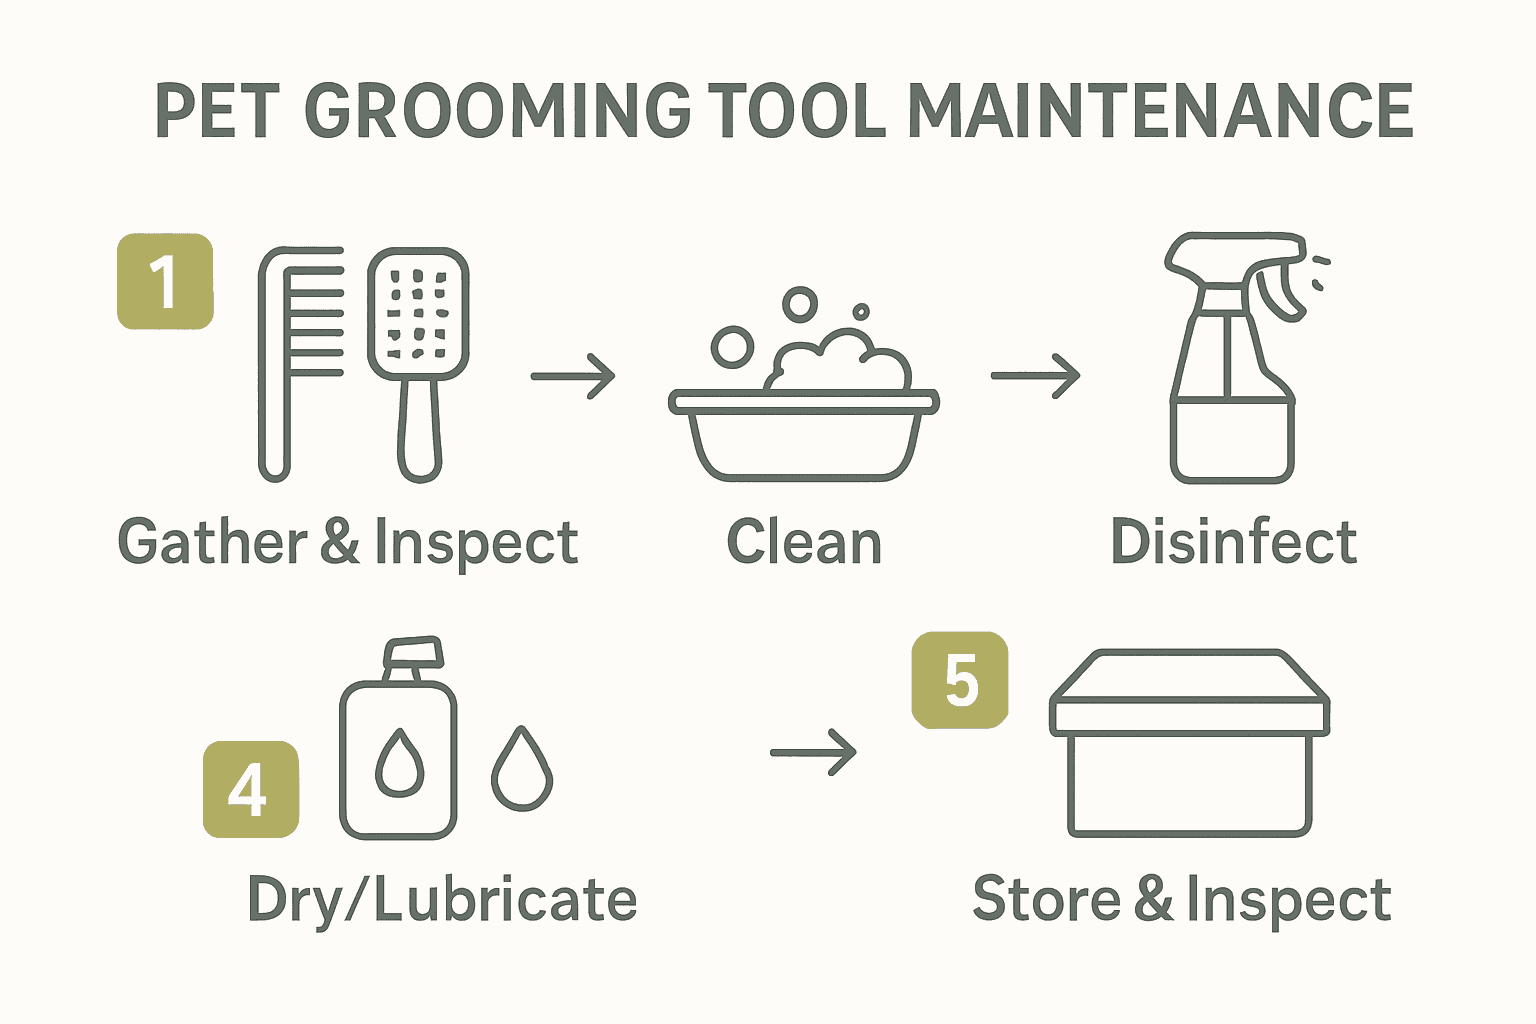
- Step 1: Prepare All Pet Grooming Tools For Maintenance
- Step 2: Clean Off Hair And Debris Thoroughly
- Step 3: Disinfect And Sanitize Each Tool Properly
- Step 4: Dry And Lubricate Moving Parts Carefully
- Step 5: Inspect And Store Pet Grooming Tools Safely
Quick Summary
| Key Point | Explanation |
|---|---|
| 1. Gather and Inspect Tools First | Collect all grooming tools and check for wear or damage before starting maintenance to ensure effectiveness. |
| 2. Clean Thoroughly with Detergent | Remove all hair, dirt, and debris using a mild detergent to maintain hygiene and functionality of tools. |
| 3. Disinfect Tools After Cleaning | Use a bleach solution and follow proper contact times to sanitize tools, preventing bacterial growth effectively. |
| 4. Dry and Lubricate Moving Parts | Ensure tools are completely dry before applying lubricant, which prevents rust and maintains smooth operation. |
| 5. Store Tools Safely and Inspect Regularly | Keep tools in a dry, cool place and check for damage periodically to extend their lifespan and maintain functionality. |
Step 1: Prepare All Pet Grooming Tools for Maintenance
Getting your pet grooming tools ready for maintenance requires careful planning and organization. This step ensures your tools remain clean, functional, and ready for your next grooming session.
According to AKC, before starting any grooming process, you need to gather the right tools such as nail trimmers, styptic powder, brushes, combs, and other essential equipment. Start by collecting all your grooming tools and laying them out on a clean, flat surface.
Next, inspect each tool carefully. Check for signs of wear, damage, or buildup of hair, dirt, or debris. Pay special attention to metal components like scissors, clippers, and nail trimmers. Look for rust, dullness, or any mechanical issues that might compromise their performance. ASPCA recommends regular maintenance to keep your tools in top condition and ensure effective grooming.
Pro Tip: Create a dedicated grooming tool maintenance kit with cleaning supplies like rubbing alcohol, soft cloths, and lubricating oil to make your maintenance process smoother.
Once you have gathered and inspected your tools, you are now ready to move on to the actual cleaning and maintenance process. Having everything organized and assessed will make the subsequent steps much more efficient and effective.
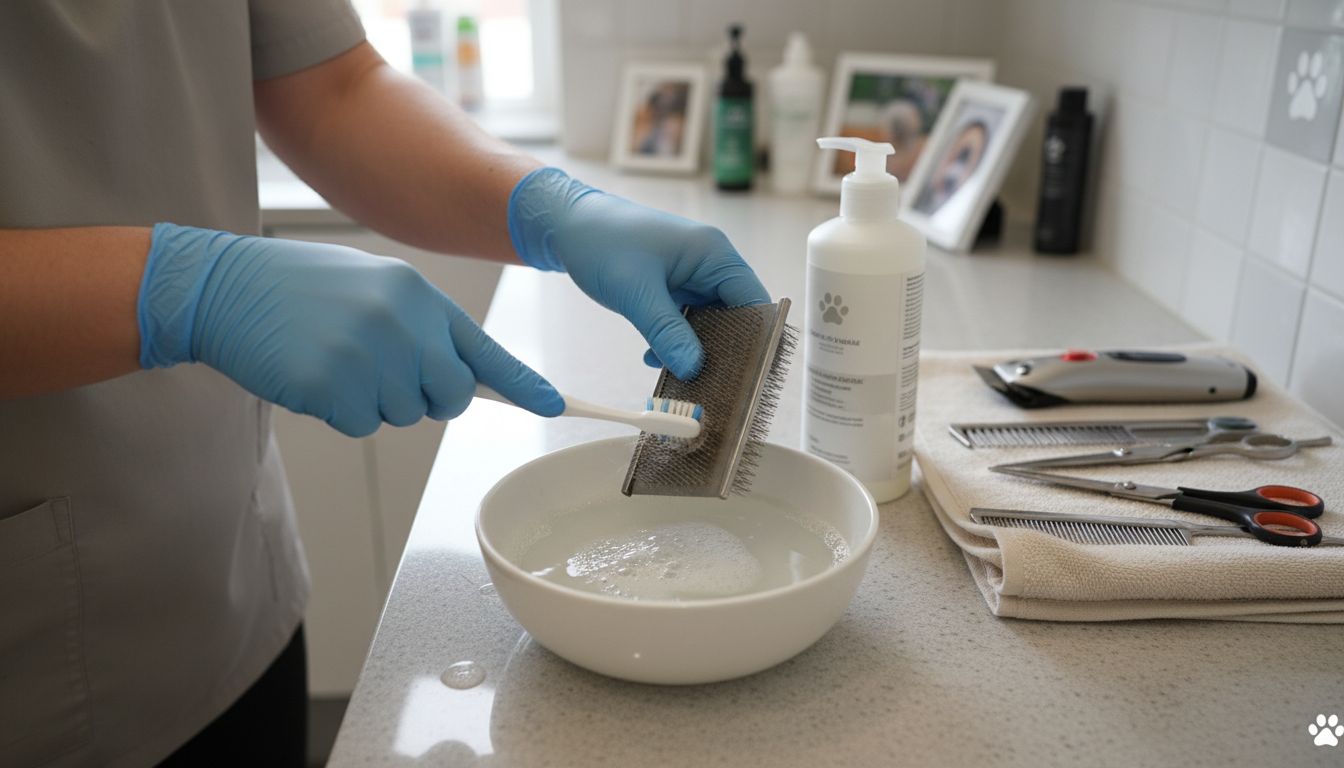
Step 2: Clean Off Hair and Debris Thoroughly
Cleaning your pet grooming tools thoroughly is a critical step in maintaining their performance and hygiene. This process removes accumulated hair, dirt, and potential bacteria that can compromise your tools effectiveness.
According to CFSPH, start by removing any visible contamination like dirt, hair, or debris before washing. Use a mild detergent such as dishwashing soap with warm water. Pro tip: Choose a soap with grease removers to help eliminate oils and stubborn residue more effectively.
Pay special attention to different tool types. Brushes and combs require careful cleaning between bristles to remove trapped hair. Metal tools like scissors and clippers need extra care to prevent rust and maintain sharpness. Illinois Professional Pet Groomers emphasizes that all equipment should be sanitized after each use to maintain professional standards of hygiene.
Cleaning Hack: Use an old toothbrush to get into hard to reach areas and remove hair and debris from tool crevices.
Once your tools are thoroughly cleaned, you are ready to move on to the next maintenance step of disinfecting and storing your grooming equipment properly.
Step 3: Disinfect and Sanitize Each Tool Properly
Disinfecting and sanitizing your pet grooming tools is a crucial step to prevent bacterial growth and maintain optimal hygiene. This process protects both your pets and the longevity of your grooming equipment.
According to CFSPH, creating an effective disinfection solution is straightforward. Mix ½ cup of bleach (5.25% sodium hypochlorite) with 1 gallon of water. The key is ensuring proper contact time with the disinfectant solution. Most solutions require about 10 minutes of contact to effectively kill bacteria and germs.
Different tools may need slightly different approaches. Metal tools like scissors and clippers can be wiped down with alcohol based disinfectant. Brushes and combs might require soaking. Illinois Professional Pet Groomers emphasizes the importance of sanitizing all tools after each use to maintain professional hygiene standards.
Pro Tip: Always wear protective gloves when handling bleach solutions and work in a well ventilated area.
After thorough disinfection, you will be ready to dry and store your grooming tools properly for their next use.
Step 4: Dry and Lubricate Moving Parts Carefully
Drying and lubricating your pet grooming tools is a critical maintenance step that ensures their longevity and optimal performance. This process prevents rust, reduces friction, and keeps mechanical components functioning smoothly.
According to CFSPH, proper drying is essential. After cleaning, let items dry thoroughly and consider placing grooming tools in sunlight to speed up the process. For wooden brushes, place them bristles down on a clean towel to minimize water damage and prevent warping.
Focus special attention on moving parts like clipper blades, scissors, and electric trimmers. Apply a thin layer of specialized lubricating oil to metal components, ensuring smooth operation and preventing rust. Illinois Professional Pet Groomers emphasizes the importance of maintaining equipment in good condition to ensure safety for both personnel and animals.
Pro Tip: Use a clean microfiber cloth to apply lubricant evenly and remove any excess oil that could attract dirt.
With your tools now dried and lubricated, they are ready for proper storage and will be in excellent condition for your next grooming session.
Step 5: Inspect and Store Pet Grooming Tools Safely
Inspecting and storing your pet grooming tools properly is the final crucial step in maintaining their performance and extending their lifespan. This process ensures your tools remain in top condition and ready for your next grooming session.
Illinois Professional Pet Groomers emphasizes that equipment must be maintained on a regular schedule and kept in good condition for both personnel and animal safety. Carefully examine each tool for signs of wear, damage, or potential malfunction. Look for loose screws, worn out bristles, rust spots, or any mechanical issues that could compromise the tool’s effectiveness.
Storage is just as important as inspection. According to CFSPH, ensure tools are completely dry before storage. Choose a cool, dry place away from direct sunlight and humidity. Consider using a dedicated toolbox or protective case with separate compartments to prevent tools from banging against each other and potentially causing damage.
Pro Tip: Invest in silica gel packets to absorb moisture and prevent rust in your storage container.
By following these careful inspection and storage practices, you will help ensure your pet grooming tools remain in pristine condition for years to come. Check out our guide on essential pet grooming tools for more detailed insights into maintaining your equipment.
Keep Your Pet Grooming Tools Performing Like New
Maintaining your pet grooming tools is not just about cleanliness it is about preserving their sharpness, preventing rust, and ensuring each grooming session goes smoothly without any unexpected tool failures. If you have experienced dull blades or rusty scissors, it can add stress and frustration to caring for your beloved pet. Tools that are not properly cleaned, disinfected, and lubricated every time risk harming your pet or simply falling apart sooner than expected.
Discover a wide selection of high quality Pet Grooming Tools | Paw Heroes Shop designed for durability and easy maintenance. Now is the perfect moment to upgrade your kit with tools that stand up to regular cleaning and keep your grooming routine efficient and safe. Visit Paw Heroes Shop today and equip yourself with equipment that supports your commitment to excellent pet care. Don’t wait for your tools to fail — act now for peace of mind and a happier grooming experience.
Frequently Asked Questions
How often should I clean my pet grooming tools?
Regularly clean your pet grooming tools after each use to maintain optimal performance. Remove hair and debris with a soft cloth or brush, ensuring they remain hygienic for your next session.
What is the best way to disinfect pet grooming tools?
To disinfect pet grooming tools, mix ½ cup of bleach with 1 gallon of water and soak the tools for about 10 minutes. Ensure you wear gloves and work in a well-ventilated area while allowing proper contact time for effective cleaning.
How can I prevent rust on metal grooming tools?
Prevent rust on metal grooming tools by thoroughly drying them after cleaning and applying a thin layer of lubricating oil on moving parts. Store them in a cool, dry place and consider using silica gel packets in your storage container to absorb moisture.
What steps should I take for maintaining clipper blades?
To maintain clipper blades, clean them thoroughly after each use, disinfect them, and lubricate them with specialized oil. Regular maintenance helps keep blades sharp and functioning smoothly, enhancing their lifespan.
How do I store my grooming tools to extend their life?
Store your grooming tools in a dedicated toolbox or protective case, keeping them dry and away from humidity and direct sunlight. Ensure they are completely dry before storage to prevent damage and extend their lifespan.
What signs indicate that my grooming tools need to be replaced?
Signs that your grooming tools need replacing include visible damage, excessive rust, dull blades, or malfunctioning mechanisms. Inspect them regularly and if you notice any issues, consider replacing them to ensure safe and effective grooming.